This post may contain affiliate links. If you click an affiliate link and make a purchase, I may earn a commission. Also, as an Amazon Associate, I earn from qualifying purchases.--
Just like the electric vehicles that are common sights on our streets and highways, electric bikes are here to stay. The global electric bike (also known as e-bikes) market was an estimated $16.3 billion in 2017, and by 2025 that number is projected to reach $25 billion.
E-bikes range in price from around $500 to over $5,000 depending on the features you want. It is, therefore, an investment worth caring for, and with a little know-how and elbow grease you can keep your e-bike running for years to come. It starts with proper cleaning.
So you may be asking yourself, how do I clean my electric bike? For best results, you will need a set of bike cleaning brushes, clean towels, a bucket, a garden hose with spray nozzle, and a few other household items. You will also need cleaning and lubricating agents, including a mild detergent, degreaser, and bike chain lube. A thorough cleaning of your e-bike should take about half an hour.
Before we get started on this step by step guide to cleaning your e-bike, it is important to become familiar with the various parts and components of your electric bicycle that you will be cleaning. As you will see, certain components require greater attention and care compared to others.
The Major Components of an Electric Bike
Before we get started on the cleaning process, it is important to understand the components of your electric bike and get an idea of how it works so that you can clean it properly.
Working our way from the front of the e-bike to the rear, these are the major components that virtually all electric bikes have in common.
Many of these parts are found on conventional (non-powered) bicycles as well. We will be referring to these parts when we dive deeper into cleaning your e-bike.
Front of the E-Bike – Wheel and Forks
The front wheel and tire are mounted between the front forks of the e-bike, which attaches to the frame at the bottom of the headset (the part of the e-bike frame where it meets the handlebars and front forks).
The front brakes are attached to the top of the forks near the bottom of the headset. Electric mountain bike forks have shocks built into them for riding over rugged terrain.
Handlebars
The handlebars are mounted on the top of the headset. All of the hand-operated functions of the electric bike are found on the handlebars, including the front and rear brake levers, the gear shifters, and the power switch.
In the case of full-throttle e-bikes, the throttle control is usually integrated into one of the handle grips. The e-bike display is also mounted on the handlebars.
Frame
All the e-bike parts and components attach to the frame, which usually consists of lightweight, high-strength metal tubes welded together. The structural strength of the electric bike comes from the frame.
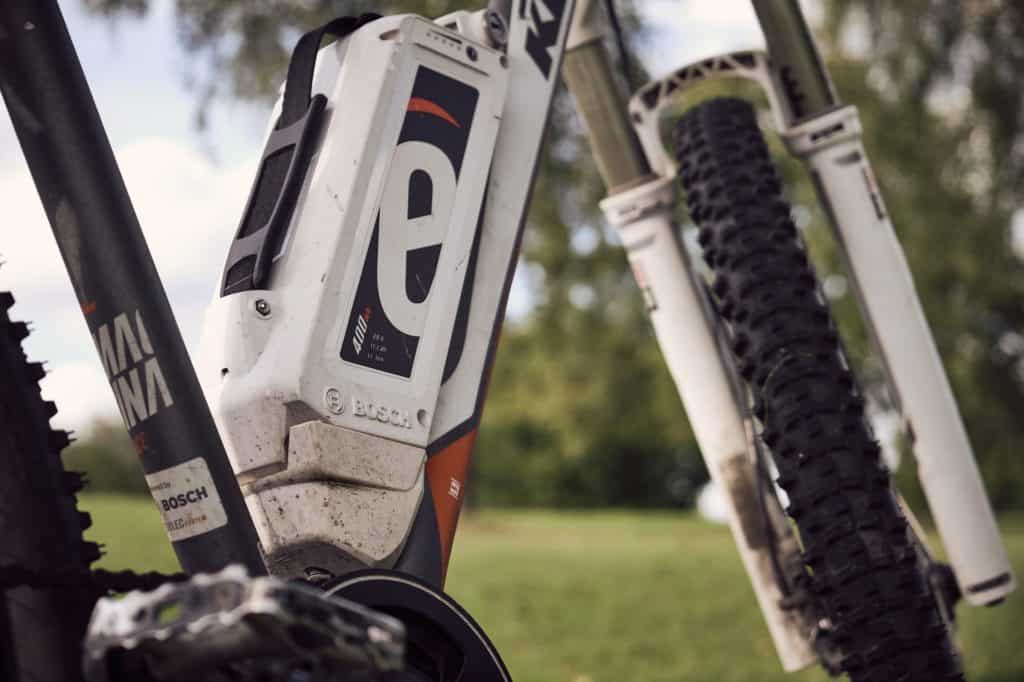
Battery
The e-bike battery supplies the electricity that powers the motor. It is mounted on the frame and on many bikes is so well integrated into the frame design that it is hardly noticeable.
Most electric bike batteries are lithium ion incorporating multiple cells linked together in a single housing or casing. Most e-bike batteries are removable to enable easier charging.
Saddle and Seat Post
The saddle is mounted on top of the seat post, which slides into the seat post binder on the e-bike frame. The height of the saddle is adjustable to accommodate riders of various sizes.
Drivetrain
The drivetrain is the heart of any bicycle, let alone an e-bike. It consists of several key components and is what allows forward movement.
Special care and attention must be given to the drivetrain during cleaning and most of your time will be spent degreasing and lubing the various drivetrain parts.
Chain
The chain is a series of metal links that are connected together to form a closed loop. The chain is what enables the energy created by the e-bike cranks or motor to travel to the cogs (gears) on the rear wheel, which in turn propel the electric bicycle forward.
Chain Ring
The chain ring is the large disc to which the cranks are attached. The chain ring has teeth all around its circumference to which the links of the bike chain align and interlock.
When the cranks are pedaled or when the motor engages, the chain ring turns in a clockwise direction. Multi-speed e-bikes sometimes have more than one chain ring of different sizes.
Cogs
Cogs look much like smaller versions of the chain ring in that they are also disc-shaped with teeth all around their circumferences.
The number of cogs corresponds to the number of “speeds” that the e-bike has; the larger the cog, the less energy that is required to propel the e-bike forward, but the lower the corresponding speed, and vice-versa. The cogs are connected to the hub on the rear wheel.
Cassette
Collectively all the cogs are referred to as the cassette. The cogs are essentially sprockets of varying sizes, and they are arranged with the largest cog closest to the rear wheel hub and the smallest cog furthest from the hub.
Derailleur
The derailleur is a device that enables the bike chain to move from one cog to another, thus varying the energy required to propel the e-bike forward.
The derailleur is mounted below the cassette and consists of two small sprockets known as jockey wheels. In electric bikes that have multiple chain rings, there will also be a front derailleur to switch from one to another.
Motor
The motor powers the electric bike, whether in pedal-assist mode or full throttle mode. E-bike motors are either mid-mounted (integrated with chain ring and cranks) or hub-mounted (front or rear wheel). Ranging in power from 250 to 750 watts, electric bike motors are fully encased by a protective cover to protect them from the elements.
Controller
The controller functions as the e-bike’s brain, telling it what the rider wants it to do, whether it be engaging pedal-assist on a steep hill or powering the throttle so that the rider can take a breather. The controller is usually contained in an enclosed box or casing near the motor.
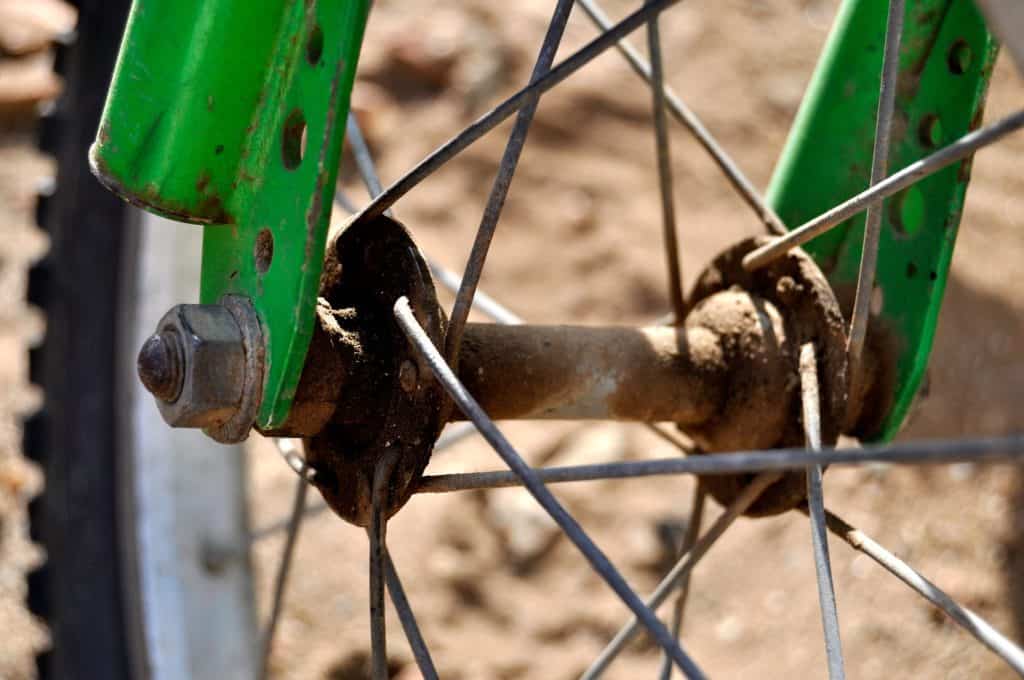
Rear Wheel & Tire
The rear wheel has the cassette attached to its hub and moves the e-bike forward. It also bears the majority of the rider’s weight. The rear brakes are mounted to the bike frame just above the clearance between the rear tire and the bike frame.
Cleaning Your Electric Bike
Now that we have reviewed important parts of an electric bike, we can turn our attention to proper cleaning techniques.
It is recommended that the e-bike be kept upright during cleaning and not flipped upside-down onto its handlebars and saddle as many sources suggest doing. We do not want water or any cleaning agents to enter small openings in the bike frame or components.
The frequency of cleaning your e-bike will depend on your riding habits. Off-road or mountain biking will require a cleaning after each ride, while regular road riding (commuting to and from work for example) will necessitate less frequent and less extensive cleanings.
Although it is optional, a bicycle work stand will make cleaning much easier. This is particularly true when cleaning the drivetrain because, in order to most effectively degrease and re-lube the chain, chain ring, sprockets, and derailleur, the parts must be moving.
Unlike conventional bicycles where the chain will travel in reverse when the pedals are cranked backwards, an electric bike’s chain will not move at all when pedaling in reverse.
It is, therefore, necessary to pedal the bike while in a stationary position, and this would be best done with a work stand. Otherwise, an alternative means of suspending the rear wheel above the ground will be needed.
Electric bikes are completely safe to ride in the rain or in wet conditions. In general, e-bike electronics are considered water-resistant but not waterproof. Therefore, it is important to note that most, if not all, e-bike manufacturers advise that the battery must be removed prior to cleaning (particularly if water or liquids will be involved).
Step One – Spraying Down the E-Bike
What You Will Need for this Step:
- Garden hose with spraying nozzle (with multiple spray patterns)
- Bicycle work stand (optional)
Prior to spraying down your electric bike, ensure that the battery has been removed. Also, using dry towels or pieces of cloth, cover the display, power switch, and battery contacts (in the battery housing). Alternatively, you can wrap these components with plastic wrap or cover with plastic bags. The important thing is to protect the e-bike’s electronics from excessive exposure to water and detergents.
With the spray nozzle set to a shower or gentle spray pattern, hose down the e-bike from top to bottom. This will rinse off any large debris and dirt, primarily from the bike frame, rims/spokes, and tires.
Do not use a pressure washer to clean your e-bike. While it will undoubtedly make very quick work of removing dirt and grime, it will also force water into seals and inside cable sheaths such as those that control the brakes and gear shifting.
There are three areas to avoid spraying water onto directly or forcefully: (1) the headset (where the handlebars and forks attach to the frame), (2) the bottom bracket (where the chain ring and cranks attach to the frame) and (3) the front and rear wheel hubs. What all of these components have in common is that they contain bearings that can become damaged by excessive water exposure.
Step Two – Degreasing the Drivetrain
What You Will Need for this Step:
- Degreaser (e.g., Simple Green which is biodegradable)
- Spray bottles
- Flathead screwdriver
- Bike cleaning brushes (highly recommended)
- Bike chain cleaning tool (highly recommended)
Degreasing and lubing the entire drivetrain is perhaps the most important part of cleaning your e-bike. Particularly with electric bikes since they are powered by motors, these components undergo a great amount of stress and use. Keeping these parts clean and well-lubricated will prolong the life of the chain, chain ring, cassette, and derailleur.
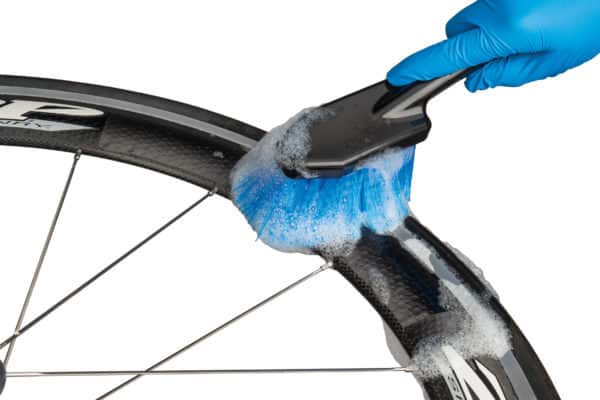
For best results, purchasing a set of bike cleaning brushes (Amazon) is highly recommended. Each brush is specialized for cleaning a particular part of the bike, for example, the frame, the cogs (gears), and hard-to-reach places.
Removing Grease from the Derailleur
The derailleur hangs below the cassette and guides the bike chain during gear shifting. Because the chain runs through the derailleur regardless of what specific sprocket or cog is being used, the derailleur can accumulate more dirty lubricant than any other drivetrain part, especially the two small jockey wheels. The mixture of grease and dirt can become thick and putty-like and thus requires manual removal.
Slowly turning the crank so that the jockey wheels are spinning, hold a flathead screwdriver against the sides of each jockey wheel so that the old grease scrapes off. You may want to place a pan or small bucket underneath the derailleur to catch the scrapings.
Spraying the Drivetrain with Degreaser
Prepare a mixture of 50% concentrated degreaser and 50% water and fill your spray bottle. Liberally spray the entire length of chain, the chain ring(s), all the sprockets, and the entire derailleur with the degreaser solution. Allow the degreaser to sit and start loosening the old and dirty lubricant. It may be necessary to spray several times for the degreaser to penetrate thickly coated parts and areas that are tucked away.
Degreasing the Chain
Properly cleaning the bike chain can be one of the more challenging aspects of cleaning your e-bike. Fortunately, many useful tools specially designed and engineered for cleaning bicycles are easily found in bike shops and online. One such tool is a bike chain cleaning tool, which allows the entire length of chain to be thoroughly cleaned in a matter of minutes.
Fill the bike chain cleaning tool’s reservoir with a 50/50 solution of degreaser and water. Since the chain cleaning tool is designed for conventional bikes (which can be pedaled backwards) and electric bikes (which cannot) be sure to orient the cleaning tool with the travel direction of the bike chain in mind. You need to ensure that the chain is properly aligned with the cleaning brushes inside the tool.
Turn the cranks for approximately 30 to 35 revolutions to ensure that the entire length of bike chain travels through the cleaning tool multiple times. If necessary, repeat this process, discarding the dirty solution and refilling with clean solution, until no grease or dirt is visible on the links and the chain appears clean and shiny.
Degreasing the Chain Ring and Cogs
Liberally spray the chain ring(s) and all cogs in the cassette with the degreasing solution. For particularly heavy build-up it may be necessary to increase the percentage of concentrated degreaser in your spray bottle mixture. All the degreaser to sit for a few minutes to penetrate and loosen up the grime.
Starting with the chain ring, use a cleaning brush (with medium firmness bristles) to scrub all around the chain ring including the teeth. Carefully and slowly turn the crank to expose all the gear teeth scrubbing them as they go by. Clean both sides of the chain ring in this manner.
Using the gear cleaning brush (or a toothbrush with firm bristles) scrub each cog removing grime from the teeth and the sides of each. Turn the cranks periodically to rotate the cogs and expose their teeth.
Grease can accumulate between the cogs, so it is important to reach down and clean inside these gaps as well. Many gear cleaning brushes have a narrow hooked end with notches that are specifically designed for cleaning the spaces between cogs and removing caked up grime.
Spray Down the Drivetrain
Once all the components of the drivetrain have been thoroughly scrubbed and cleaned, gently spray down these parts with a hose (use the shower pattern on your spray nozzle). Exercise caution that you do not spray directly or forcefully on the bearing seal areas of the bottom bracket and rear wheel hub.
Step Three – Cleaning the E-Bike Frame and Other Components
What You Will Need for this Step:
- Bucket
- Dishwashing liquid
- Scrub brush (soft bristles)
- Sponge
Fill your bucket with water and add 1-2 teaspoons of dishwashing liquid (roughly 3-4 squirts). Using a sponge, clean the e-bike frame with this mild cleaning solution. This includes the front forks, handlebar grips, saddle and seat post. Be careful around the power switch and display.
When cleaning the front and rear wheels and tires, switch to a soft bristled brush. Scrub the tires and rims using the same cleaning solution. Clean both cranks and pedals in the same manner (being careful near the bottom bracket). Cleaning the wheel hubs can be tricky because of the wheel spokes. A toilet bowl brush (a new one, of course) is the perfect cleaning tool for this because of its longer handle.
If your electric bike has a hub-mounted motor, you will need to exercise caution when cleaning the wheels even though the motor is encased by a protective cover. You should also be mindful when cleaning or rinsing near the motor and controller units even though these components are housed in protective housings.
Once the entire electric bike has been cleaned, gently spray down the entire bike with your hose (shower pattern) to rinse off all cleaning agents. As in Step One, start from the top of the bike and work your way down to ensure that all the detergent is washed away.
Step Four – Drying
What You Will Need for this Step:
- Clean, dry towels (at least two)
- Air compressor with hand-held nozzle (optional)
It is important to thoroughly dry your e-bike after cleaning to prevent the formation of any rust and to protect all bearings and moving parts. Using clean, dry towels, wipe down the entire bike working slowly and meticulously to absorb all visible traces of water. This step must be done completely before you can start the process of re-lubricating the drivetrain components.
While completely optional, an air compressor with a hand-held nozzle attachment will make quick work of drying hard-to-reach areas by using compressed air to blast away moisture. Another trick after wiping down is to gently bounce the electric bike a few times on each wheel to knock off any remnant water droplets.
Step Five – Re-lubricating the Drivetrain
What You Will Need for this Step:
- Bike chain lubricant
- Spray lubricant
Once your e-bike is clean and dry, you can perform the crucial last step of re-lubricating the entire drivetrain. This is vital toward maintaining the peak operating condition of your bike chain, chain ring, and cogs. It will also prolong the life of your motor and battery by ensuring they do not work any harder than needed.
When lubricating the chain, be sure to use a lubricant that is specifically formulated for bicycle chains. Slowly turn the cranks and methodically apply drops of lube to the chain as it travels by, ensuring that all links get coated. To completely lubricate the bike chain, it may be necessary to apply the lubricant to both the outer (facing away from the gear teeth) and inner sides (facing toward the gear teeth) of the chain.
Moving on to the cogs, a spray lubricant does a better job of coating each sprocket and all of its teeth. Again, make sure that the spray lubricant is formulated for bike cogs (or chains). It may be helpful at this stage to start with the chain moved to the largest cog while spraying the smaller cogs and then moving the chain to the smallest cog while spraying the larger ones to ensure complete coverage.
The final component to lubricate is the derailleur. Again, the spray lubricant does a better job of coating the jockey wheels and their teeth. It may be necessary to spray from different angles to ensure complete coverage. If your e-bike has multiple chain rings, then you will need to lubricate the front derailleur in the same manner.
Once all the moving parts of the drivetrain have been properly lubed, if your electric bike is on a work stand, turn the cranks and shift from gear to gear to ensure that lubricant is evenly distributed throughout the cassette, derailleur, chain ring and the chain itself.
Otherwise, you can simply take your e-bike for a short ride making sure to shift through all the gears as you go.
Maintenance Tips for Your Electric Bike
Regular cleaning and lubricating of your electric bike will help keep it in optimal riding condition. Another part of that equation is proper maintenance. Here are a few key tips to prolong the operating life of your electric bike.
Battery Life
Since an electric bike’s motor runs on electricity supplied by the on-board battery, it would be prudent to take measures to prolong the life of said battery. There are several conditions that affect the longevity of e-bike batteries.
First, virtually all electric bike batteries are lithium ion. As such, they are somewhat sensitive to temperature. Whenever practical e-bike batteries should be stored at room temperature and charged while the batteries themselves are at room temperature. For example, after a 50-mile ride an e-bike battery will feel warm to the touch. Allow the battery to cool down before charging.
At temperatures exceeding 105° F (e.g., battery left in the trunk of a car or bike left sitting out in the sun) electric bike batteries can lose performance and start to degrade.
Second, lithium ion electric bike batteries are best charged to 80% of a full charge, not 100%. Studies have shown that charging to 80% results in a far greater number of useful cycles compared to a lower number of useful cycles at 100%. This is a similar finding to studies performed on electric vehicle batteries with Tesla’s founder supporting the notion that the ideal charge for battery longevity is 80%.
Lastly, an e-bike battery should not be left for prolonged periods (days or weeks) at a 100% charge. If charged to full, the battery needs to be partially spent before prolonged inactivity. In fact, a 50% charge is considered the ideal long term storage percentage for electric bike batteries. You can read more about charging an ebike battery here.
Tire Pressure
It is well known among bicycle enthusiasts that bike tires quickly lose their inflation pressure. Maintaining proper tire pressure is particularly important to electric bike riders because low tire pressure increases the chances of suffering a flat tire. Electric bike wheels are more difficult to remove than conventional bike wheels and require greater skill.
Bicycle tires have the recommended inflation PSI (pounds per square inch) written on the side walls, and it is recommended that tire pressures be checked every several weeks.
It is important to note that low tire pressure can also directly affect your electric bike’s performance and range. E-bike shop owners have commented that a surprising number of repair visits concerning loss of riding range are actually caused by underinflated tires.
Emergency Kit
Whether you are embarking on a 30-mile trek or a quick trip around the corner, it is a good idea to carry an emergency kit with you whenever you go out for a ride on your electric bike. These items can be carried in your backpack or fanny pack and may get you out of a potentially difficult situation.
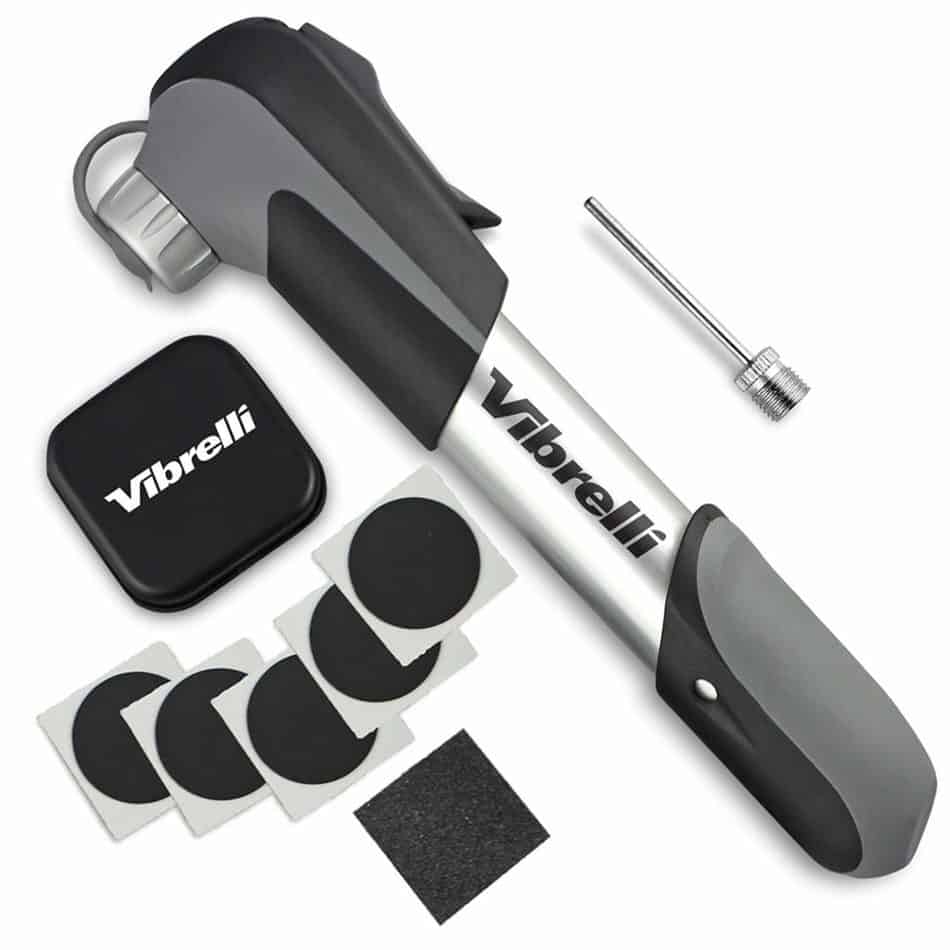
- Mini Pump – Not only will a mini pump be able to inflate under-inflated tires, but if you have a slow leak in a tire this may be enough to get you home. This is also a good thing have around because many electric bike tires have stems and valves that are not compatible with gas station air hoses as those are designed for inflating vehicle tires. Vibrelli makes a cheap, but functional mini bike pump. See on Amazon.
- Tire Patch Kit – Wheels of an e-bike may not be easily taken off for tire repairs. However, if the flat tire is caused by a puncture versus a rupture or tear, then a simple patch can remedy the problem. The advantage of patching a flat tire is that the wheel does not need to be removed; simply prying out the bead of the tire to expose the inner tube where the puncture lies is all it takes.
- Tool Kit – A small assortment of tools can be the difference between riding your e-bike home and calling a friend to pick you (and your e-bike) up. A set of Allen wrenches will enable you to loosen and remove just about any part of your e-bike, and a pair of tire irons will be needed to perform the aforementioned tire patching.
- Cell Phone – Last but not least, if all else fails make sure you bring your cell phone to make that emergency call.
Keeping this small emergency kit handy when riding your electric bike will surely save you a lot of trouble if any unexpected circumstances crop up.