This post may contain affiliate links. If you click an affiliate link and make a purchase, I may earn a commission. Also, as an Amazon Associate, I earn from qualifying purchases.--
Do you ever feel like your bike isn’t cooperating? Do you notice your gears slipping under pressure when you’re trying to get up a hill? If so, you’re not alone! Many cyclists have experienced this frustrating problem.
I’ve ridden pretty much every type of bike that exists over the last decade or more, and I’ve experienced gears slipping on many of them.
Bike gears slip under pressure because of one of seven reasons.
In this post, I’ll take a look at exactly the seven possible reasons why your bicycle chain is slipping, and the fixes for each.
Reason 1 – A Loose Chain
This is number one on this list for a reason!
The most common cause of gear slippage is a loose chain. The issue is also the simplest to fix. (Phew!)
A newly installed chain can become too slack when it extends to accommodate the extra tension. Since no replacement parts are required, you may fix the issue quickly and easily.
It’s probably safe to assume that a loose chain is the issue to look for if your bike gears are slipping under pressure.
How to Fix
Here is a detailed explanation of how to adjust the derailleur on a bicycle’s chain.
- Mount the bicycle properly — to begin, put your bike in an appropriate viewing posture. Turning your bike upside down is the quickest and easiest solution. This helps your search for the derailleur and subsequent access to the wheels.
- Identify the derailleur screw and place it — your bike is now in the correct position, so finding the derailleur screw should be simple. The derailleur appears to be a complex mechanism with many gears and fasteners.
A derailleur will look something like this:
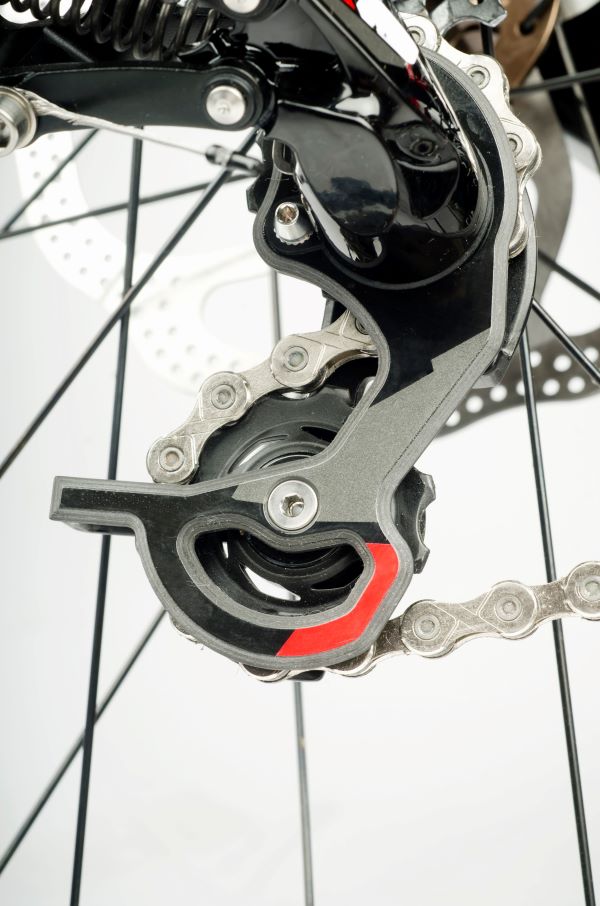
Commonly, a “B” will be etched next to the screw found behind the derailleur. You can simply adjust the tension of a bicycle chain using this screw. To tighten the chain, turn it clockwise.
- Access the rear tire — the derailleur chain tension must be adjusted next by gaining access to the back tire. Taking this next step will require disassembling things, so time to focus! Step one is to release the brakes from the cord. Following that, the rear tire can be accessed by raising the brake lever.
- Adjust the rear tire — since you can now reach the back tire, you can fine-tune it. Increase derailleur chain tension by adjusting the wheel’s axle. You can ride with confidence, knowing that your bike chain won’t loosen up on you.
But don’t over-tighten the derailleur chain because that can cause your ride to be interrupted.
- Reassemble everything — the final step is to reassemble your bike and give it a test ride. Reconnect the brakes and give the screws a final twist to ensure the chain is properly tensioned. Give the wheels a quick spin to check for any contact with the chain or the frame.
You’ve properly tightened your bike chain if neither of the two outer links touches the inside link. The final step is to test your bike’s functionality by riding it. (Source)
Reason 2 – Misalignment of Gear Indexing
Here’s a bit of a brain teaser for you:
A misaligned gear index is related to a loose chain.
A misaligned gear system can be caused by a loose chain.
Alternatively, the problem could be caused by a loose barrel adjustment. A bike’s cable’s length can be adjusted with the help of a barrel adjuster.
Brake cables, gear cables, caliper cables, and derailleur cables are just a few of the many cables that make up a bicycle.
How to Fix
Set the derailleur’s effective range before trying an adjustment.
To get the derailleur to shift to the smallest cog, you must first release the pinch bolt. When you get to the smallest cog, stop pedaling and look and listen to see how smoothly the chain is moving.
There shouldn’t be any clicking or skipping in the chain’s motion. If everything goes smoothly; no need to worry about the maximum capacity.
Observe the chain’s motion on the cog more closely if you see skipping.
The chain’s upper limit needs adjusting if it’s not going directly from the top jockey wheel to the tiny bottom cog.
Your bike’s derailleur can be threaded in or out to alter its relationship to the smallest cog. With the top gear chosen, pedal forward and depress the derailleur’s bottom knuckle to shift the chain into the largest cog.
Adjusting the lower limit screw in the same way as the upper limit screw can help when the chain is having problems entering the largest gear or jumping over it into the wheel spokes.
Reason 3 – Worn Out Chain
Gear skipping can also be caused by a worn-out chain. As a result of heavy use over a long period, the chain may have stretched beyond its normal limits.
The chain may have lost touch with the sprockets and chainring teeth due to the plates and rollers wearing out.
The chainrings and sprockets will also wear out faster if you wait to replace a worn-out chain.
How to Fix
Over time, the rollers and rivets on the inside of a chain will wear down, giving the chain the appearance that it is stretching.
This wear can cause the chain to fall out of alignment with the gears and chainrings, resulting in difficulty shifting and early cog wear.
Since this wear is permanent, it is important to keep an eye on your chain’s condition and replace it when necessary to prevent the need for a complete overhaul of your drivetrain.
When experiencing chain skip, a sudden chain break, or violent shifting, it is important to check the condition of the chain.
Top tip – Once a month, even if you’re not having any problems, you should inspect the chain to make sure it’s not too worn. And make sure the lubricant is working properly. A dry chain produces a lot of noise when pedaling and makes the gear changes feel slow.
Reason 4 – Worn-out Chainring & Sprocket Teeth
Even with a worn chain, an electric bike will still function.
However, the longer it remains there, the more harm it does to the rest of the drivetrain.
Teeth will wear down on the chainring, the crank arm, and the sprockets on the rear wheel as you pedal. There is an increased risk of damaging other drivetrain components if you continue to utilize a worn and overworked chain.
How to Fix
To keep the chain from wearing out the chainrings too quickly, it is important to keep it well-lubricated with suitable chain oil and to replace the chain regularly.
Never lubricate a dirty chain, as this can wash abrasive particles into the rollers and behave as an abrasive paste, shortening the life of the chain.
Before applying chain oil, make sure the chains are clean. After the lubrication has had time to work its way through the chain, it should be wiped dry. It is possible to damage your sprockets and chainwheel by improperly shifting gears.
Reason 5 – Mismatched Replacement Parts
Spare components for bicycles are just as specific as those for automobiles and other machines.
A slipping chain might be a sign that you’ve used subpar replacement components on your drivetrain.
Also, if you buy a chain with plates that are too large for the sprockets and chainrings, the chain will slip and cause damage.
How to Fix
The chain, chainring, cassette, and freehub may all show signs of wear on a bike.
If you run a thorough diagnostic, you’ll be able to know exactly what needs to be repaired or replaced. Keep in mind that if you find a worn part, you should replace it right away to protect the rest of the machine from failure due to the worn part.
The same goes for putting together a bike with improper components. If you buy the wrong components and realize your mistake quickly, you can always try to swap them for the right ones at a local spare parts store.
If the return is unsuccessful, you will have to write off the parts as a loss and buy new ones.
Reason 6 – Gear Shifting Mechanism Error
Bicycle gear slippage troubles may also be attributable to the shifting mechanism.
The shifting system has many moving parts, including the rear derailleur, shifter, cable, and derailleur hanger.
The derailleur’s hanger is flexible, so it can be shifted if it takes a hit or is subjected to excessive force. If the shifter is of low quality, the shift cable may slack and cause the chain to come off the gears.
Another cause of slipping gears is a shifter cable that has lost its flexibility.
How to Fix
Although the limit screws should remain in their proper positions once set, the cable tension may require adjustment as additional miles are accumulated.
Tightening the wire to restore its original state of smooth shifting is a common necessity in such situations.
The term “cable stretch” is sometimes used to describe this occurrence.
Here’s how you can fix this problem:
Step 1 – Find The Barrel Adjuster
The barrel adjuster component is often positioned close to the rear derailleur’s cable exit point.
By turning the barrel adjuster in a clockwise direction, you can increase the pressure on the cable by shortening the distance between the two ends of the cable.
To tighten the cable, move the barrel adjuster counterclockwise to increase the distance between the anchor points.
Step 2 – Shift the Gear to the Smallest Cog
Engage the cassette’s smallest gear.
While you’re riding, click the shifter lever to go up a gear. Adjust the cable tension by turning the cable a quarter of a turn and trying again if the derailleur does not immediately shift the chain into the next cog.
Loosen the cable tension by rotating the adjuster of the barrel clockwise a quarter turn at a time if pressing the shifter lever once to go into higher cog results in the chain missing up two cogs in the cassette or rubbing on the next highest cog.
Step 3 – Keep Shifting Until Desired Cable Tension Reached
If you want to progress, you need to keep moving up in ring size. The cable tension must be increased if the derailleur does not move the chain to the next larger ring.
After you’ve worked your way up to the biggest gear, you should shift back into the smaller rings. Before making a successful movement, release the tension in the cables.
It’s important to keep doing this until the shifting is completely silent and smooth. (Source)
Reason 7 – Damaged Freehub
The back wheel of a bicycle moves forward thanks to the freehub, a component of the hub that communicates with the powertrain.
A freehub is usually a cylinder shape.
When you start pedaling, it engages, and when you stop, it disengages. Even when you’re not pedaling but still making forward progress, you can hear the familiar whirring sound.
Gear slippage can occur when the wheel hub loses contact with the drivetrain for a brief period due to a damaged freehub or freehub shell.
How To Fix
Pretty simple this one – get a new freehub!
Visual Learners
If you’re someone that prefers to see how to fix their slipping gears rather than read about it, then a great video to watch is this one:
A Quick Overview And Glossary Of Bike Drivetrain Components (That You May Need)
The drivetrain of your bicycle is the set of components that transforms your muscular effort into forward motion.
It’s probably safe to assume that you’re familiar with some of the components of this drivetrain: chains and pedals.
Aside from these common components, however, others allow you to transform your energy into motion. The chain travels between the chainrings held between the crank arms and the cassette attached to the rear wheel hub when you pedal.
- Chain Links — the chain links engage teeth on the chainrings and cassette to propel the bike’s back wheel. In the case of single-speed bikes, the chainring will consist of a single plate; for those with multiple front gears, two or even three chainrings will be linked together. These days, most bicycles only have a single chainring and no front gears. The cassette that is fastened to the back wheel might have anywhere from five to ten sprockets (the name of an individual gear plate).
- Derailleurs — In addition to these five major components, the drivetrain also includes the front and rear derailleurs. The derailleur is responsible for moving the chain to the desired gear. Bicycles with front gears include a front derailleur, which shifts the chain to the appropriate cog. A front derailleur is not included on a bicycle that does not have front gears. When shifting gears, a front derailleur directs the chain onto the appropriate sprocket on the front cassette, while a rear derailleur directs the chain onto the appropriate sprocket on the rear cassette.
Final thoughts
Hopefully, I’ve offered some interesting insights into how your bike gears work and how to get them working perfectly again.
It might take a little extra time and know-how to fix them, but bike gears don’t have to slip for the rest of their useful lives. They can run smoothly for many, many miles if given just a little TLC.