This post may contain affiliate links. If you click an affiliate link and make a purchase, I may earn a commission. Also, as an Amazon Associate, I earn from qualifying purchases.--
So you want to remove your bike’s cassette and the lockring has other plans. Why is the lockring so stubbornly stuck or stiff? This is a common question that riders tend to have when it’s time to replace their cassette. If you care about not damaging the cassette or wheel (or your shoulder) then you know that simply using brute force isn’t the way to go. After scouring the internet, I’ve found that there isn’t a lot of reliable online advice to address the issue.
Well fear not, here’s a top-down summary of how to fix the issue: You can use penetrating oil, hot water, or a hairdryer to loosen up the lockring. You can then use a wrench with a long lever for extra leverage while ensuring there is sufficient support to pin the wheel in place as you turn the wrench.
In this article, I will provide an in-depth look into why the issue occurs and all the ways that you can resolve it. I hope you can stick to the end to fix it fully, to hopefully not have to spend money on buying a brand-new wheel out of frustration.
Let’s dive straight in!
Reasons Why The Lockring Is Stiff
Before we find out how to remove the stuck lockring, we need to find out why it is stuck in the first place.
Of course, the default thought is that it was overtightened sometime ago; which can be a reason. However you might recall it not being overly tightened before, so why is it so tight now?
Well, it is also worth noting that since the lockring prevents components from becoming loose during rotation (source), it can get tightened over time from simply riding the bike. This tends to be the case for both cassettes and freewheels.
What can also happen over time is that corrosion can develop between the lockring, its threads, and the cassette; making it stuck and not budge. If you often store your bike outside, then it’s more likely that corrosion has built up in between the elements and contributed to its stiffness.
If the lockring has been taken off before without being lubricated properly, then this may have contributed to its stiffness now.
How To Remove The Stuck Lockring
So you’ve tried and tried (and tried again) but the stuck lockring won’t turn. How in the world can it be removed?
Before we go through the tips, I recommend that you remove the wheel from your bike before attempting any of them as it’d make removing it so much easier.
Since it’s stuck, you will need to use some force when turning it. As such, I suggest that you go about the whole process carefully and wear protective gloves to avoid hurting yourself (or whoever may help you turn it).
Finally, I presume it’s not ‘stuck’ because you are turning the lockring the wrong way🤭. If it is, don’t worry it can happen to any of us!
Before you get a new wheel or bike, consider doing the tips to remove it:
1. Use Penetrating Oil To Loosen Up The Lockring
Penetrating oil is great for loosening all kinds of stuck or corroded nuts and bolts because of its low viscosity; making it flow easily. When used, it can enter the narrow spaces between the threads (source), helping to loosen a stuck, rusted, or corroded lockring.
- Apply a good penetrating oil (like this one on Amazon) into and around the lockring.
- If necessary you can give the lockring a few taps with a spanner (or other tool) to help loosen it up and help the oil penetrate its threads.
- Wait for about 20 minutes. This should allow the oil to penetrate the lockring’s threads and the connected parts.
2. Give It The Hairdryer Treatment
A bit of heat can expand the lockring enough to loosen it up. A hairdryer should provide enough heat. Some people have suggested using a blow torch (or something of the sort). However, if you do choose this, then be cautious as it could destroy some parts such as nylon spacers or plastic washers in your setup.
Using a hairdryer to blow hot air onto the lockring for about 2 or 3 minutes could be sufficient to loosen it up a bit.
Separately, some people have suggested pouring hot water onto your lockring to loosen it up. If all else fails, then you could consider doing this too.
3. Standard Method To Remove the Lockring And Cassette
After you’ve used penetrating oil or a hairdryer to loosen up the lockring, it’s time to remove the lockring and cassette. I will outline the standard method in case you haven’t tried it yet.
Please note that if you have already tried this method (and loosened the lockring with penetrating oil or hairdryer, etc.) but your lockring still won’t come off, then don’t worry. I will outline other useful tips later in this article.
Steps:
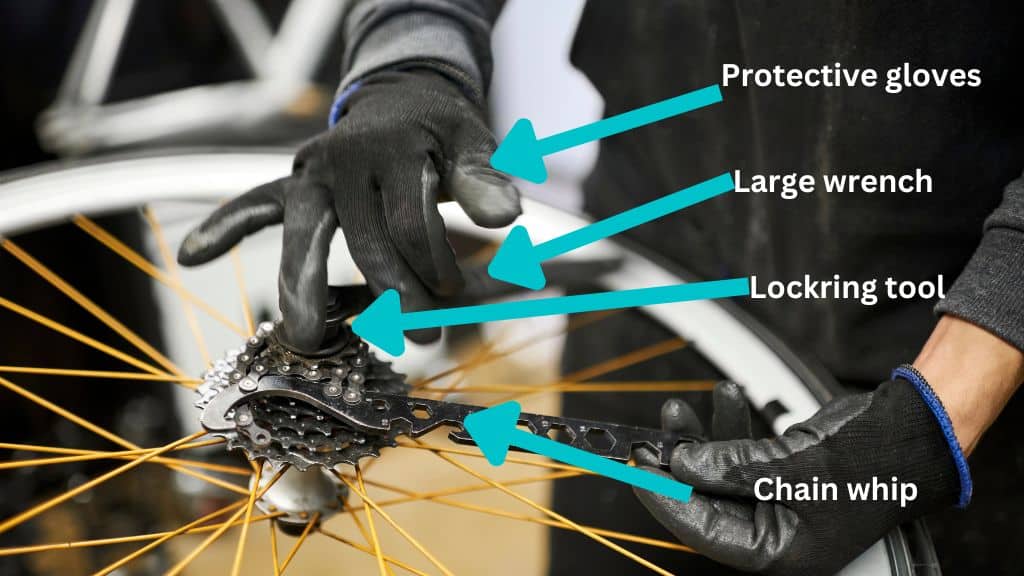
- Wear a pair of protective gloves (gardening gloves will also do). In addition to protecting your fingers, this should help give you a good grip when removing the lockring and cassette.
- Fit the lockring tool onto the lockring.
- Wrap the chain whip to a cog in the cassette to hold it in place and stop it from moving freely. Use one hand to hold onto the chain whip handle.
- Use another hand to hold an adjustable wrench onto the lockring tool and turn counter-clockwise; removing the lockring and cassette.
Here’s a useful video to give you a visual representation if that’s what you need to follow the steps:
Additional Tips To Remove A Stubborn Lockring
So you’ve tried all the steps above and the lockring still won’t budge. Well, it’s not time to get a new wheel or bike just yet. Here are more tips to help you remove that stubborn lockring:
4. Pin The Wheel For Better Support
A stubborn lockring is jammed to its connected parts, and applying more force is likely to help finally remove it. To do so, you’re going to need something sturdy to support the wheel as you turn the lockring. You can consider using the following to pin the wheel for support:
- A vice
- A bike rack or pole – tie the wheel to the rack using zip ties or steel wires to hold it firm.
- Pin the wheel in between your legs.
- A wall – place the tire of the wheel to the wall, while you secure the other tire with your leg.
- A strong friend 💪 who can hold the wheel in place and also hold onto the chain whip while you turn the wrench.
5. Use A Wrench With A Longer Lever
Using an adjustable wrench with a long lever provides a lot more leverage to turn a stuck bolt or nut. It could be exactly what you need to finally get the lockring to turn. That’s why I prefer this 24-inch adjustable wrench – check it out at Amazon. Its long lever is perfect for getting the leverage you need to remove the stubborn lockring.
Alternatively, you can get a wrench extender tool, which can fit onto your existing wrench and provide you with the length that you need. If you have a long metal pipe lying around, you can also use it as a makeshift extender to fit your wrench into. Use it to help get the leverage you need to turn the lockring.
Here is an infographic of all the 5 steps to remove a stubbornly stiff lockring. Do ensure to share it with that friend who needs it most!

How To Prevent A Lockring From Getting Stuck In The Future
So now you’ve hopefully been able to remove the lockring. Hooray!
As previously mentioned, simply riding your bike can lead to the lockring being tightened over time. So there’s not much you can do there, however there are other things you can do to reduce the chances of it being jammed.
You can store your bike indoors (if you can) instead of outside, to reduce the chances of the cassette, lockring, and other parts of your bike being corroded over time.
When putting it back onto your cassette, you should lubricate it and its threads, to reduce the chances of it being jammed when it’s time to remove it again.
By How Much Should I Tighten The Lockring?
Ensure it’s tight without overtightening it. Well then, how much should you tighten it? I suggest that you tighten the lockring tool by hand until can’t any longer. Then, tighten it using the wrench from the 3 o’clock position until about the 5 o’clock position. Normally, a torque of about 30 to 40 Newton meters is deemed ideal unless the manufacturer advises otherwise.
Conclusion
If you want to replace or do some maintenance on your bike cassette, one of the frustrating things to experience is a stuck lockring. I hope the 5 tips outlined in this article have provided you with all you need to finally get it unstuck.
In summary, you can use penetrating oil, hot water or a hairdryer to loosen up the lockring. You can then use a wrench with a long lever for extra leverage while ensuring there is sufficient support to pin the wheel in place as you turn the wrench to remove the lockring.
A new wheel or bike can be expensive, hopefully, this has saved you from buying one out of frustration and resolved the issue.